What Steps Are Involved in the Xentry Installation Process?
The Xentry installation process involves several key steps, from initial setup to final activation, ensuring your diagnostic system is ready to accurately service Mercedes-Benz vehicles, and CARDIAGTECH.NET provides all the tools you need to make this process seamless. By understanding each step, you can avoid common pitfalls and maximize the efficiency of your diagnostic workflow. Let’s explore the detailed installation steps and discover how CARDIAGTECH.NET can help you streamline your automotive repairs with reliable tools and expert support.
1. Understanding the Xentry System
Before diving into the installation process, it’s essential to understand what Xentry is and why it’s crucial for Mercedes-Benz diagnostics. Xentry is the official diagnostic software used by Mercedes-Benz to diagnose, troubleshoot, and program their vehicles. It provides comprehensive access to vehicle systems, allowing technicians to perform in-depth diagnostics, software updates, and module programming.
- Comprehensive Diagnostics: Xentry offers a wide range of diagnostic functions, including reading fault codes, accessing live data, and performing guided tests.
- Software Updates: The software allows technicians to update vehicle software, ensuring optimal performance and addressing any known issues.
- Module Programming: Xentry enables the programming and configuration of vehicle modules, which is essential for replacing or upgrading components.
Having the right diagnostic tools is paramount for any auto repair shop, and CARDIAGTECH.NET offers top-of-the-line equipment to support your diagnostic needs. Our selection ensures you have the best tools for efficient and accurate vehicle servicing.
2. Preparing for Installation
Before starting the Xentry installation, ensure your computer meets the minimum system requirements and that you have all the necessary components. Proper preparation will prevent installation issues and ensure smooth operation.
2.1. System Requirements
Xentry requires a compatible operating system and sufficient hardware resources to run effectively. Here’s a list of the minimum system requirements:
| Component | Requirement |
|---|---|
| Operating System | Windows 10 (64-bit) |
| Processor | Intel Core i5 or equivalent |
| RAM | 8 GB (16 GB recommended) |
| Hard Drive | 500 GB SSD |
| Display | 1366×768 resolution or higher |
| Connectivity | USB port, Ethernet port |
| Other Requirements | Administrator rights, enabled .NET Framework 3.5 and 4.8, disabled antivirus |
2.2. Disabling Secure Boot
One of the first steps before installation is to disable the Secure Boot option in your computer’s BIOS settings. This is essential for ensuring that Xentry can be installed and run correctly on Windows 10.
- Access BIOS Settings: Restart your computer and enter the BIOS settings. The key to enter BIOS varies depending on your computer manufacturer (e.g., Del, F2, F10, F12).
- Navigate to Boot Options: Look for the “Boot” or “Security” tab.
- Disable Secure Boot: Find the “Secure Boot” option and set it to “Disabled.”
- Save and Exit: Save the changes and exit the BIOS settings. Your computer will restart.
2.3. Gathering Installation Files
Ensure you have all the necessary installation files for Xentry. This typically includes the Xentry software, any required patches or updates, and activation keys.
- Xentry Software: Obtain the latest version of Xentry from a reliable source like CARDIAGTECH.NET.
- Patches and Updates: Download any available patches or updates to ensure compatibility and optimal performance.
- Activation Keys: Have your activation keys ready, as they will be required during the installation process.
3. Step-by-Step Installation Guide
Follow these detailed steps to install Xentry on your computer. Each step is crucial to ensure a successful installation.
3.1. Starting the Installation
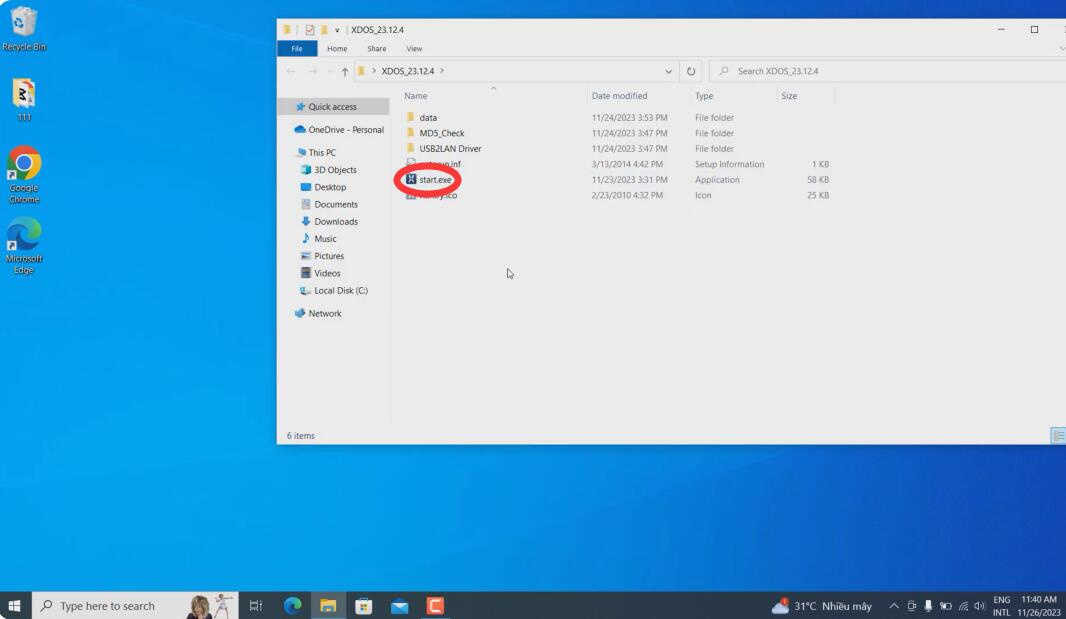
- Locate the Installation File: Navigate to the folder containing the Xentry installation files.
- Run the Installer: Double-click the “start” file to begin the installation process.
Double-click the "start" file to begin the Xentry installation process
3.2. Selecting the Language
Choose your preferred language for the installation process. This will determine the language used throughout the installation.
- Select Language: From the available options, select the language you want to use.
- Confirm Selection: Click “OK” to confirm your language selection.
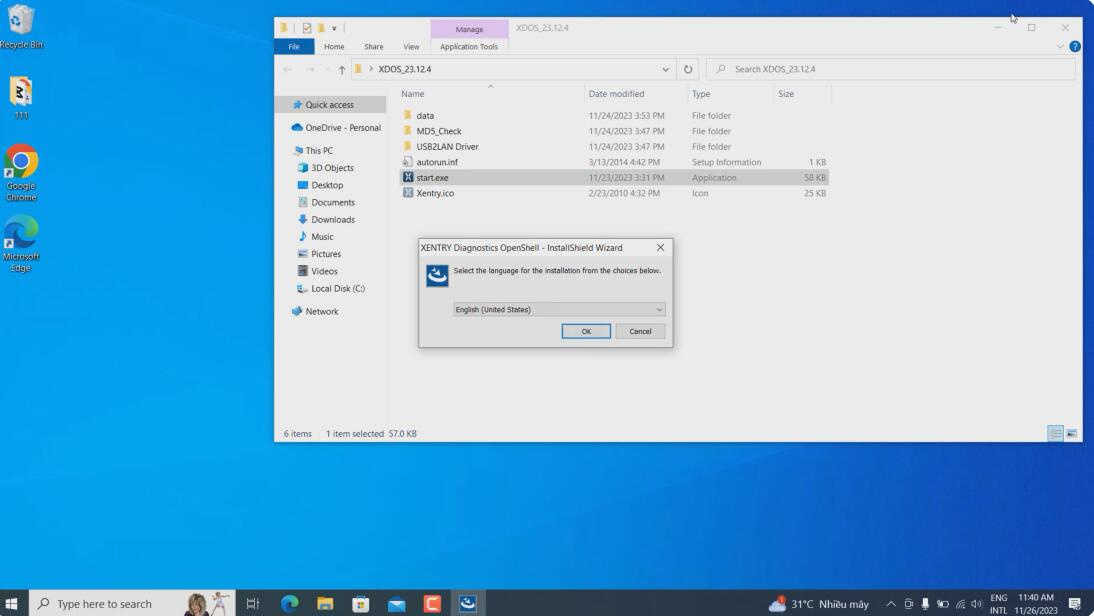 Select the language for the Xentry installation process
3.3. Installing Prerequisites
Xentry requires certain prerequisites to be installed on your computer. The installer will check for these and prompt you to install any missing components.
- Review Requirements: The installer will list the required items.
- Begin Installation: Click “Install” to begin installing the necessary prerequisites.
 Click "Install" to begin installing the Xentry prerequisites
3.4. Navigating the InstallShield Wizard
The InstallShield Wizard guides you through the main installation process. Follow the prompts to proceed.
- Welcome Screen: Click “Next” to continue.
 Click "Next" on the InstallShield Wizard welcome screen to continue the Xentry installation
3.5. Accepting the License Agreement
You must accept the license agreement to proceed with the installation.
- Read the Agreement: Review the terms of the license agreement.
- Accept Terms: Select “I accept the terms in the license agreement” and click “Next.”
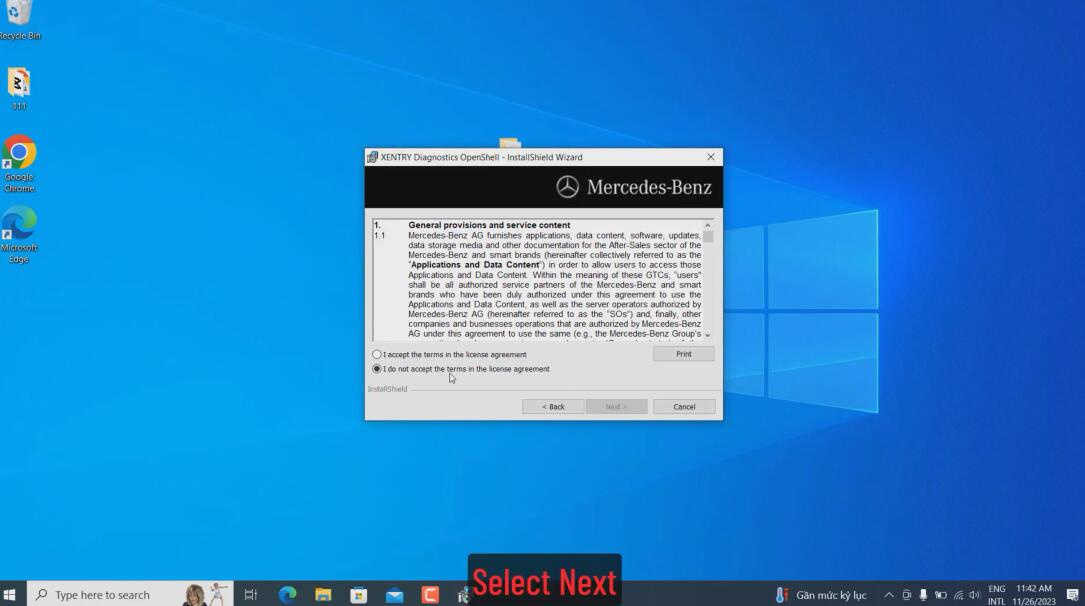 Accept the license agreement and click "Next" to continue the Xentry installation
3.6. Choosing the Installation Destination
Select the destination folder for the Xentry installation. It’s generally recommended to use the default location.
- Review Default Path: Verify the default installation path.
- Click “Next”: Proceed with the default path unless you have a specific reason to change it.
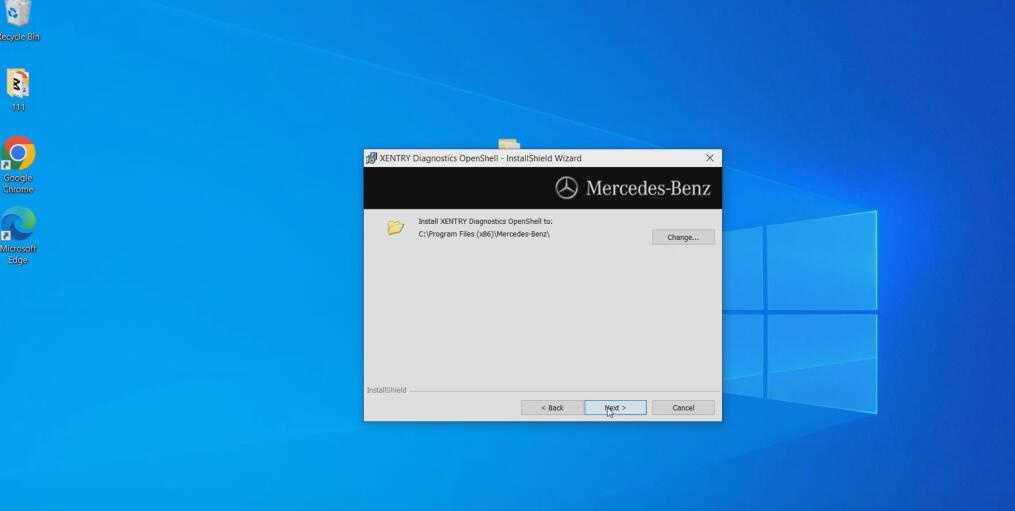 Click "Next" to install Xentry to the default destination folder
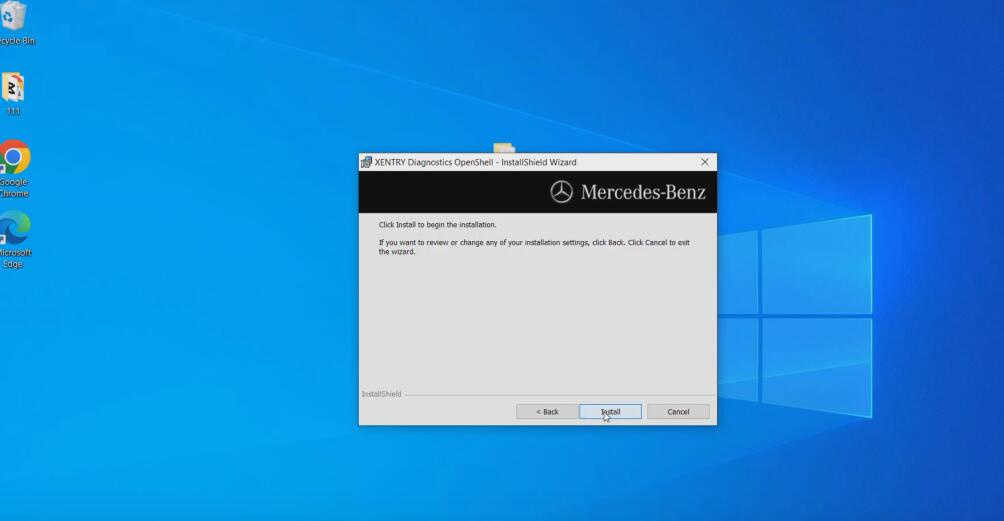
3.7. Starting the Installation Process
With all settings configured, begin the main installation process.
- Click “Next”: Confirm your settings and click “Next” to start the installation.
 Click "Next" to start the main Xentry installation process
 The Xentry installation process begins
3.8. Waiting for Installation Completion
The installation process can take a significant amount of time, depending on your computer’s performance.
- Monitor Progress: Watch the progress bar to track the installation.
- Allow Sufficient Time: Be patient, as this process may take over two hours.
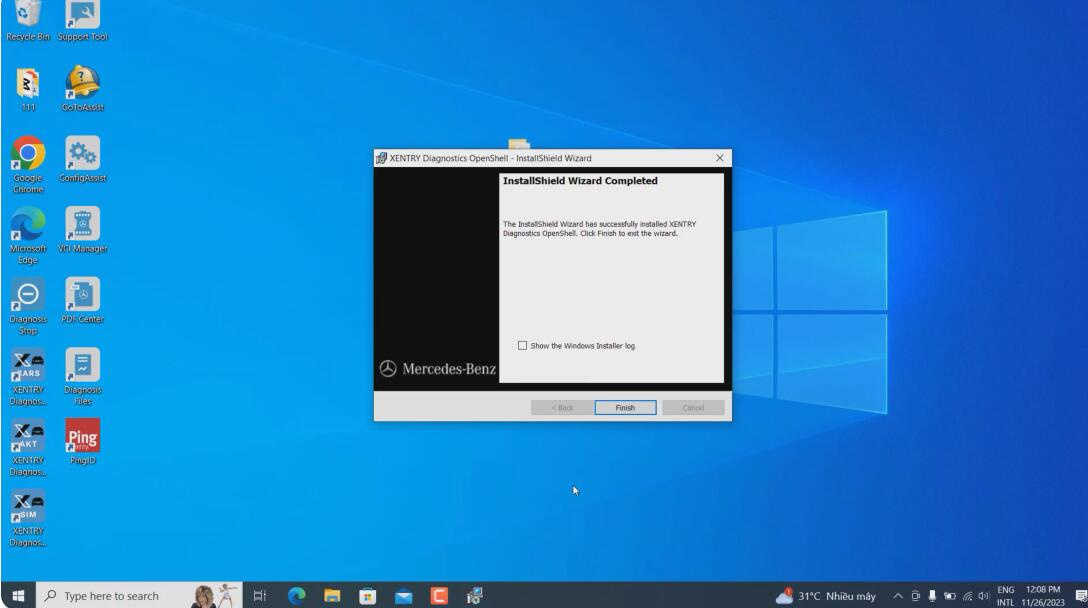
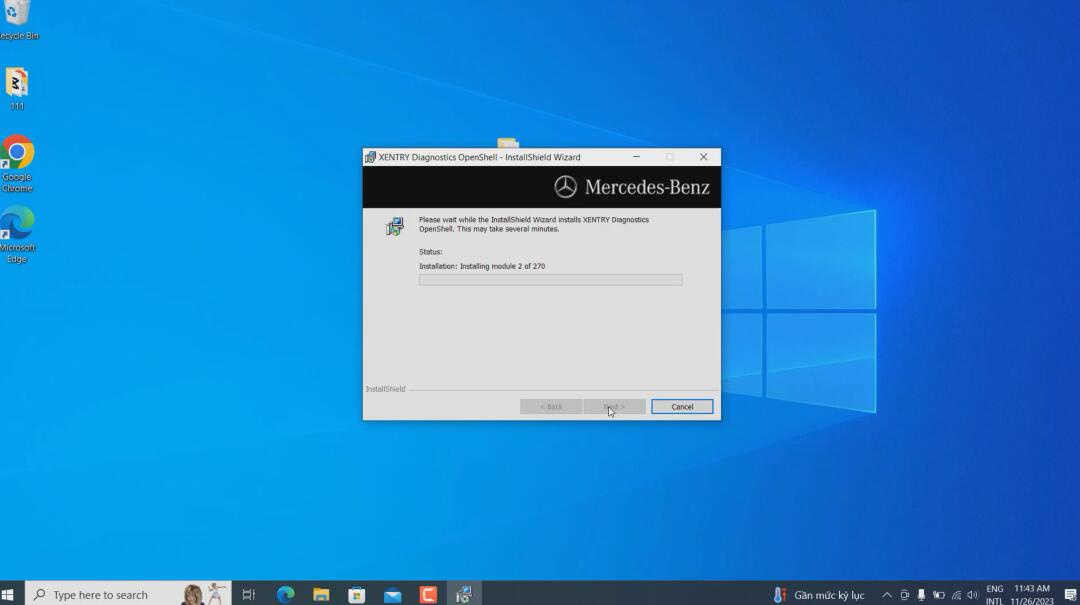 Wait for the Xentry installation process to complete
3.9. Restarting Your Computer
After all modules are installed, you will be prompted to restart your computer.
- Follow Prompt: Follow the on-screen prompt to restart your PC.
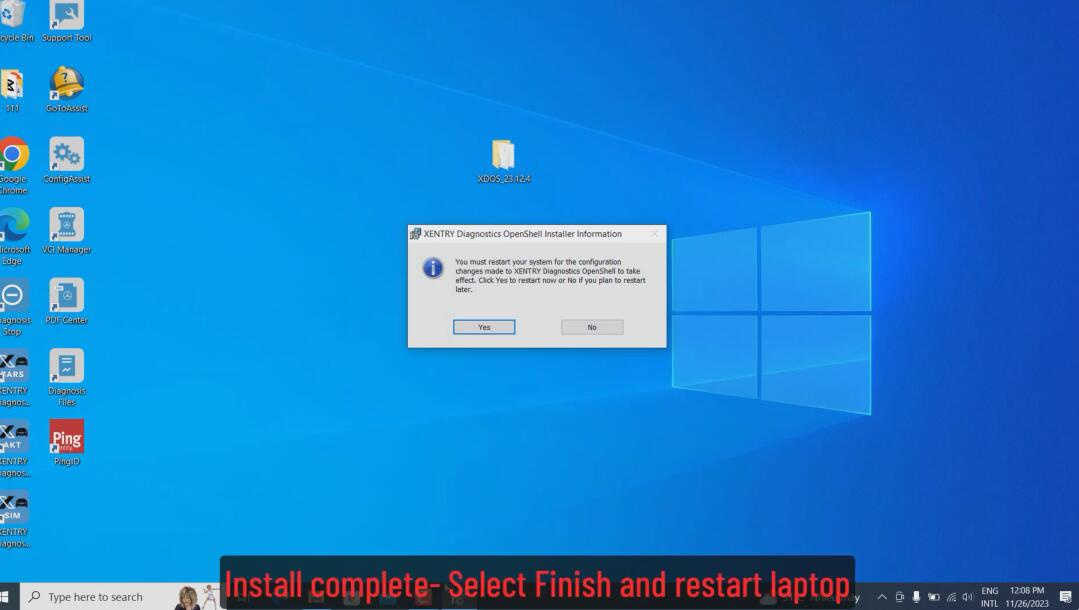
 After the installation, restart your computer
3.10. Closing ConfigAssist
After restarting, ConfigAssist will run automatically. Close this program to proceed with the next steps.
- Locate ConfigAssist: Find the ConfigAssist program running in the system tray.
- Close the Program: Right-click the icon and select “Close” or “Exit.”
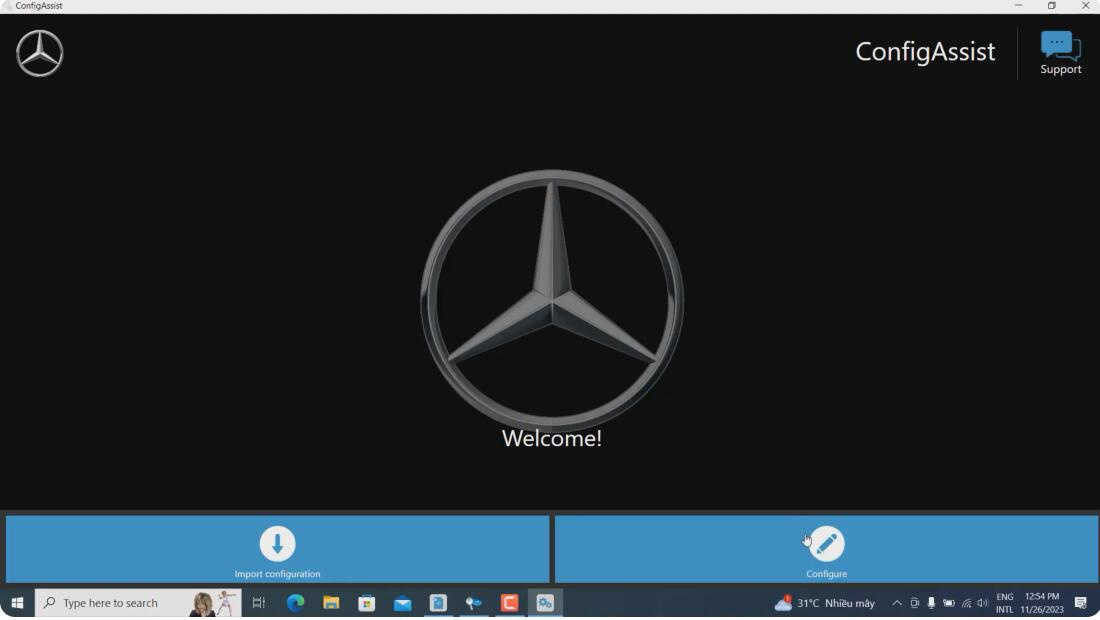
 Close the ConfigAssist program after restarting your computer
4. Post-Installation Configuration
After the main installation, several configuration steps are required to ensure Xentry functions correctly.
4.1. Copying ConnectorAPI Files
- Open ConnectorAPI Folder: Navigate to the “ConnectorAPI” folder in the installation files.
- Copy ConnectorAPI64.dll: Copy the “ConnectorAPI64.dll” file to
C:WindowsSystem32. - Run 64.reg: Double-click the “64.reg” file and add it to the registry. Click “OK” to confirm.
4.2. Copying XentryAPI.dll
- Open SysWOW64 Folder: Navigate to the “SysWOW64” folder.
- Copy XentryAPI.dll: Copy the “XentryAPI.dll” file to
C:WindowsSysWOW64. - Run Registry Key: Double-click the “old key loader for configassist or startkeycenter 64bit.reg” file and click “OK” to add it to the registry list.
4.3. Running XDOS Black List
- Run Executable: Execute the “XDOS black list.exe” file.
- Extract Files: Click “Extract” to extract the necessary files.
4.4. Copying Baureihen Pictures
- Open Baureihen Folder: Navigate to the “Baureihen” folder.
- Copy Pictures: Copy the pictures to
C:Program Files (x86)Mercedes-BenzXentryKontexteProduktuebersichtBilderBaureihen.
4.5. Creating Xentry Folder
- Navigate to Config Folder: Go to
C:ProgramDataMercedes-Benzconfig. - Create Xentry Folder: Create a new folder named “Xentry.”
- Copy GlobalUserSettings.properties: Copy the “GlobalUserSettings.properties” file from
C:ProgramDataMercedes-BenzconfigXD_MBtoC:ProgramDataMercedes-BenzconfigXentry.
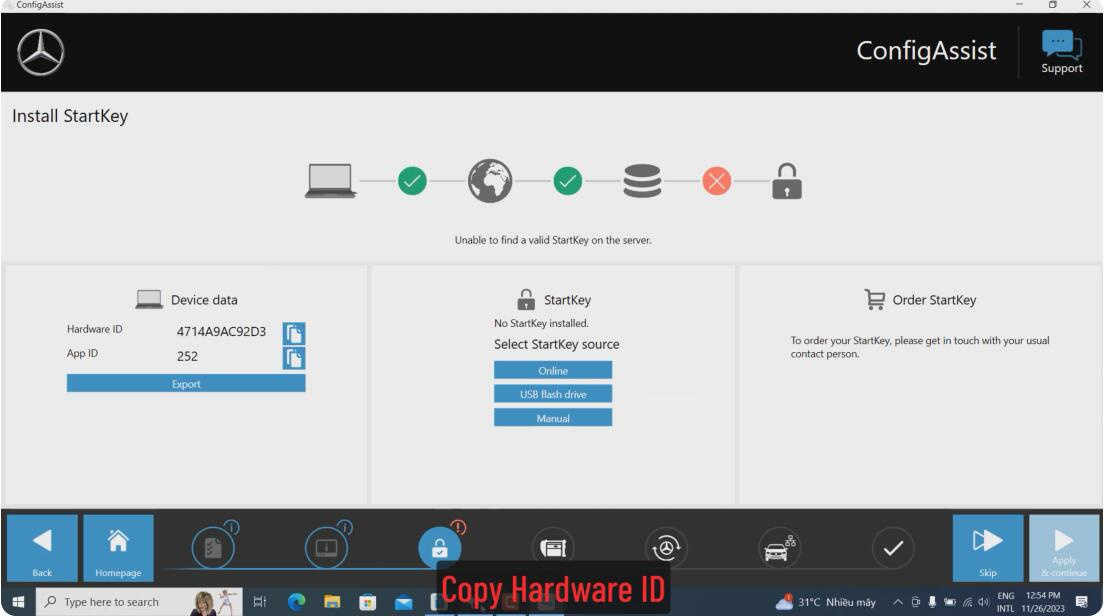
4.6. Activating Xentry
- Run ConfigAssist: You can now run ConfigAssist to perform activation.
- Copy Hardware ID: Copy your Hardware ID.
- Obtain Smart Key Code: Send your Hardware ID to
[email protected]to receive your Smart Key code (This is a paid service). - Enter StartKey Code: Click “Manual,” then input the StartKey code and click “Save.” Your StartKey is now installed successfully.
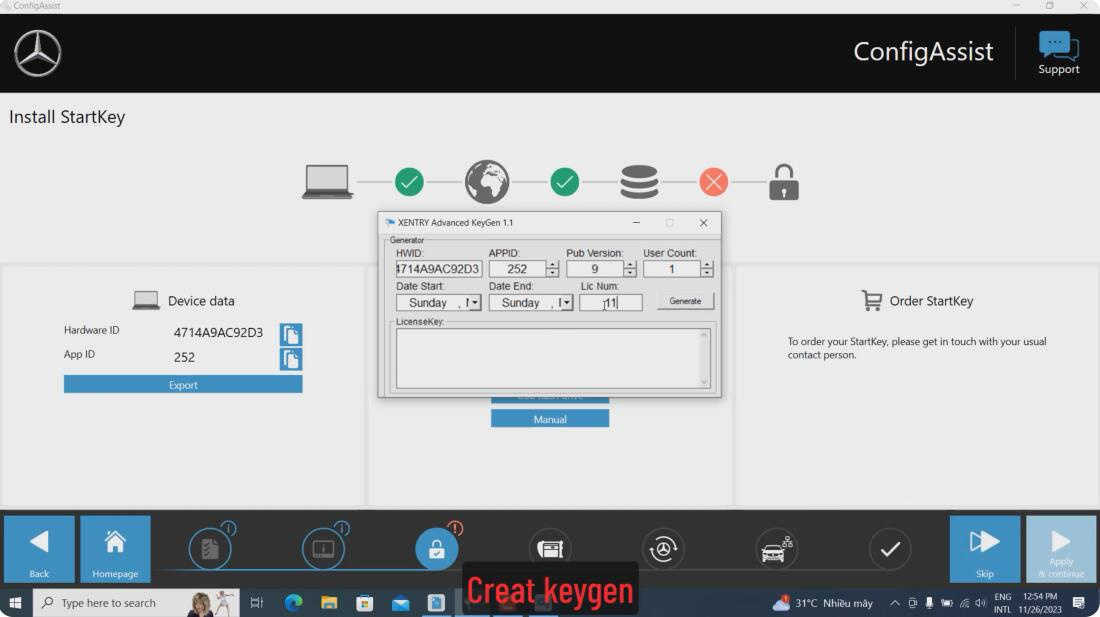
CARDIAGTECH.NET also offers XENTRY Advanced KeyGen 1.1 for long key downloads to activate multiple PCs yourself.
4.7. Modifying XentryServices.xml
- Navigate to bin Folder: Go to
C:Program Files (x86)Mercedes-BenzXentryXD_MBbin. - Cut XentryServices.xml: Cut the “XentryServices.xml” file to your desktop.
- Open with Notepad: Open the file with Notepad.
- Delete Line: Locate and delete a specific line (if applicable, depending on the version).
- Save and Replace: Save the modified file and cut it back to the original folder.
For version 12.2023, this step can be skipped and proceed to step 9. Repeat this process for the “XentryServices.xml” file in the C:Program Files (x86)Mercedes-BenzXentryXD_DTbin folder as well.
4.8. Running Backup.bat
- Copy Backup.bat: Copy the “Backup.bat” file to
C:. - Run the File: Double-click the file to run it. This will generate a “lic_key_2.dat” file. Do not delete this file.
4.9. Creating Xentry Shortcut
- Copy start_Xentry.bat: Copy the “start_Xentry.bat” file to
C:Program Files (x86)Mercedes-BenzXentryXD_MB. - Create Shortcut: Right-click the file and send it to your desktop as a shortcut.
- Use Shortcut to Start Xentry: Always use this shortcut to start Benz Xentry.
The installation and activation are now complete. To exit Xentry, double-click the “Diagnosis Stop” icon on your desktop.
 Copy the "Backup.bat" file to C: and run it to generate a "lic_key_2.dat" file. Do not delete this file.
 Create a shortcut of "start_Xentry.bat" on your desktop and use it to start Benz Xentry
 To exit Xentry, double-click the "Diagnosis Stop" icon on your desktop
 The Xentry installation and activation are now complete
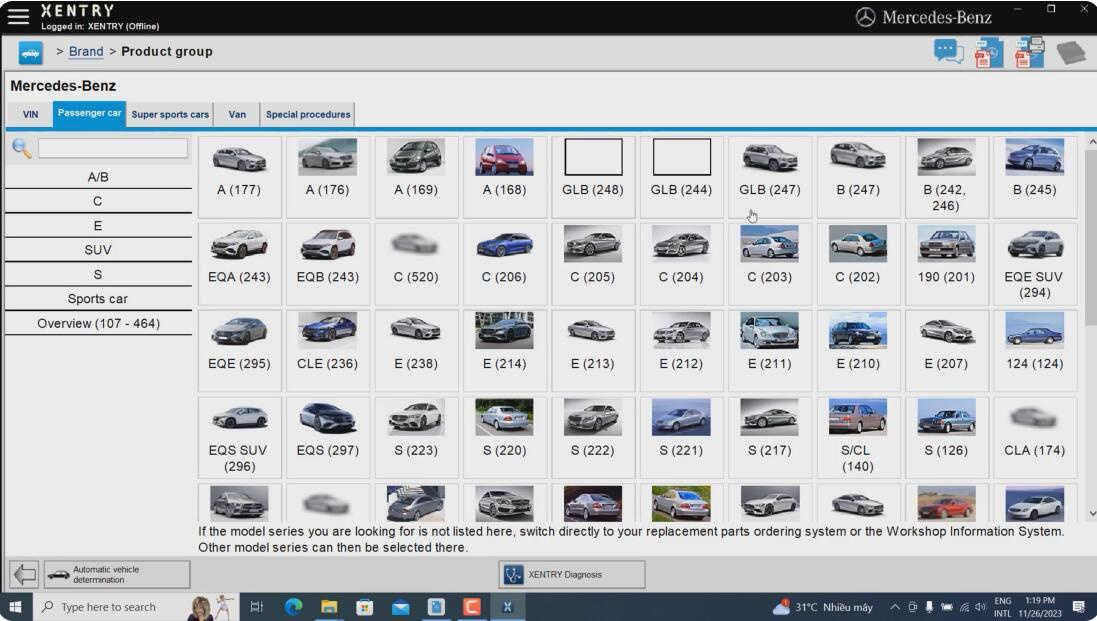
 Verify the correct installation path for all necessary files
5. Optimizing Xentry for Performance
To ensure Xentry runs smoothly, optimize your system settings and software configurations.
5.1. Adjusting Power Settings
- Open Power Options: Go to Control Panel > Hardware and Sound > Power Options.
- Select High Performance: Choose the “High Performance” power plan to maximize system performance.
5.2. Configuring Virtual Memory
- Open System Properties: Right-click on “This PC” and select “Properties.”
- Advanced System Settings: Click on “Advanced system settings.”
- Performance Settings: In the “Advanced” tab, click “Settings” under “Performance.”
- Virtual Memory: Go to the “Advanced” tab and click “Change” under “Virtual memory.”
- Custom Size: Uncheck “Automatically manage paging file size for all drives.” Select “Custom size” and enter an initial size and maximum size that is 1.5 to 2 times your RAM.
- Set and Apply: Click “Set” and then “OK” to apply the changes.
5.3. Disabling Unnecessary Programs
- Open Task Manager: Press Ctrl + Shift + Esc to open Task Manager.
- Startup Tab: Go to the “Startup” tab.
- Disable Programs: Disable any unnecessary programs that start with Windows to free up system resources.
6. Troubleshooting Common Issues
Even with careful installation, you may encounter issues. Here are some common problems and their solutions.
6.1. SmartKey Invalid Error
If you encounter a “SmartKey invalid” error, it is often related to the Secure Boot setting in your BIOS.
- Access BIOS Settings: Restart your computer and enter the BIOS settings.
- Disable Secure Boot: Ensure the “Secure Boot” option is disabled.
- Save and Exit: Save the changes and exit the BIOS settings.
 If you find SmartKey invalid,please go to BIOS setting to disable “Secure boot” option
6.2. Software Compatibility Issues
Ensure that your operating system and hardware meet the minimum requirements for Xentry.
- Check System Requirements: Verify that your computer meets the system requirements listed earlier.
- Update Drivers: Update your graphics card drivers and other hardware drivers to the latest versions.
- Run in Compatibility Mode: Try running Xentry in compatibility mode for an older version of Windows.
6.3. Activation Problems
Activation issues can arise from incorrect activation keys or problems with the activation server.
- Verify Activation Key: Double-check that you have entered the correct activation key.
- Contact Support: If the issue persists, contact CARDIAGTECH.NET support for assistance.
Our team is ready to help you resolve activation issues and get your software up and running.
 Troubleshooting activation problems
6.4. Performance Issues
Slow performance can be due to insufficient system resources or conflicting software.
- Close Unnecessary Programs: Close any unnecessary programs running in the background.
- Increase Virtual Memory: Increase the virtual memory as described in the optimization section.
- Run Disk Cleanup: Run Disk Cleanup to remove temporary files and free up disk space.
6.5. Error Messages During Installation
If you encounter error messages during installation, take note of the specific error code and message.
- Search for Solutions: Search online for solutions to the specific error message.
- Check Installation Logs: Check the installation logs for more detailed information about the error.
- Reinstall: Try reinstalling Xentry, ensuring that you follow each step carefully.
 Address software compatibility issues to avoid errors
7. Benefits of Using CARDIAGTECH.NET for Your Diagnostic Needs
CARDIAGTECH.NET offers a range of benefits for automotive technicians and shop owners.
7.1. High-Quality Diagnostic Tools
We provide high-quality diagnostic tools that meet the demands of modern automotive repair.
- Reliable Equipment: Our tools are sourced from trusted manufacturers, ensuring reliability and accuracy.
- Wide Selection: We offer a wide selection of diagnostic tools to suit various needs and budgets.
- Latest Technology: Stay up-to-date with the latest diagnostic technology to efficiently service modern vehicles.
7.2. Expert Support and Guidance
Our team of experts is available to provide support and guidance throughout the installation and operation process.
- Installation Assistance: We offer assistance with the installation and configuration of Xentry and other diagnostic software.
- Troubleshooting Support: Our team can help troubleshoot any issues you encounter during operation.
- Training Resources: Access training resources and guides to improve your diagnostic skills.
7.3. Cost-Effective Solutions
We offer cost-effective solutions to help you maximize your investment in diagnostic equipment.
- Competitive Pricing: Our prices are competitive, ensuring you get the best value for your money.
- Flexible Options: We offer flexible payment options to suit your budget.
- Long-Term Value: Our high-quality tools provide long-term value, reducing the need for frequent replacements.
7.4. Enhancing Efficiency and Accuracy
Using CARDIAGTECH.NET tools will enhance the efficiency and accuracy of your diagnostic work.
- Faster Diagnostics: Quickly identify and diagnose vehicle issues, reducing repair times.
- Accurate Results: Obtain accurate diagnostic results to ensure effective repairs.
- Improved Customer Satisfaction: Provide high-quality service that improves customer satisfaction and loyalty.
 CARDIAGTECH.NET offers cost-effective diagnostic solutions
8. Staying Updated with Xentry
Keeping your Xentry software updated is crucial for accessing the latest features, bug fixes, and vehicle coverage.
8.1. Checking for Updates
Regularly check for updates within the Xentry software.
- Open Xentry: Launch the Xentry software.
- Check for Updates: Look for an “Update” or “Check for Updates” option in the menu.
- Install Updates: Follow the prompts to download and install any available updates.
8.2. Subscribing to Updates
Consider subscribing to update notifications from CARDIAGTECH.NET or Mercedes-Benz to stay informed about new releases.
- Visit Website: Go to the CARDIAGTECH.NET website.
- Subscribe to Newsletter: Subscribe to our newsletter to receive update notifications and other important information.
8.3. Importance of Regular Updates
Regular updates ensure:
- Compatibility: Compatibility with the latest vehicle models.
- Bug Fixes: Resolution of known issues and bugs.
- New Features: Access to new diagnostic features and capabilities.
- Security: Protection against security vulnerabilities.
9. Connecting with CARDIAGTECH.NET
For any assistance or inquiries, CARDIAGTECH.NET is here to help.
9.1. Contact Information
- Address: 276 Reock St, City of Orange, NJ 07050, United States
- WhatsApp: +1 (641) 206-8880
- Website: CARDIAGTECH.NET
9.2. Why Choose Us?
- Expertise: With years of experience in the automotive diagnostic industry, CARDIAGTECH.NET provides top-tier solutions and support.
- Comprehensive Support: From initial setup to troubleshooting, we’re here to assist you every step of the way.
- Quality Products: Our commitment to quality ensures that you receive reliable and effective diagnostic tools.
10. Call to Action
Are you facing challenges with your current diagnostic tools? Do you need reliable equipment that enhances your efficiency and accuracy? Contact CARDIAGTECH.NET today! Our expert team is ready to provide personalized advice and solutions tailored to your needs. Don’t let outdated tools hold you back.
- Enhance Efficiency: Reduce repair times and improve diagnostic accuracy.
- Increase Revenue: Provide top-notch service that boosts customer satisfaction and revenue.
- Stay Competitive: Stay ahead of the competition with the latest diagnostic technology.
Contact us via WhatsApp at +1 (641) 206-8880 or visit our website at CARDIAGTECH.NET to learn more and get started. Let CARDIAGTECH.NET be your partner in success.
Frequently Asked Questions (FAQ)
Q1: What is Xentry and why is it important for Mercedes-Benz diagnostics?
Xentry is the official diagnostic software used by Mercedes-Benz for comprehensive vehicle diagnostics, troubleshooting, software updates, and module programming. It’s crucial for accessing vehicle systems and performing in-depth repairs.
Q2: What are the minimum system requirements for installing Xentry?
The minimum system requirements include Windows 10 (64-bit), an Intel Core i5 processor or equivalent, 8 GB of RAM (16 GB recommended), a 500 GB SSD, and a display resolution of 1366×768 or higher.
Q3: How do I disable Secure Boot in BIOS before installing Xentry?
Restart your computer, enter BIOS settings, navigate to the “Boot” or “Security” tab, find the “Secure Boot” option, set it to “Disabled,” save changes, and exit BIOS.
Q4: What should I do after the main installation of Xentry?
After the main installation, you need to perform several configuration steps, including copying ConnectorAPI files, copying XentryAPI.dll, running XDOS Black List, copying Baureihen pictures, creating an Xentry folder, activating Xentry, and modifying XentryServices.xml.
Q5: How long does the Xentry installation process typically take?
The installation process can take over two hours, depending on your computer’s performance.
Q6: What do I do if I encounter a “SmartKey invalid” error during Xentry activation?
Ensure that the “Secure Boot” option is disabled in your computer’s BIOS settings.
Q7: How can I optimize Xentry for better performance?
Adjust your power settings to “High Performance,” configure virtual memory to 1.5 to 2 times your RAM, and disable unnecessary programs that start with Windows.
Q8: How often should I update my Xentry software?
Regularly check for updates within the Xentry software to ensure compatibility, bug fixes, access to new features, and security.
Q9: What benefits does CARDIAGTECH.NET offer for my diagnostic needs?
CARDIAGTECH.NET offers high-quality diagnostic tools, expert support and guidance, cost-effective solutions, and enhancements to the efficiency and accuracy of your diagnostic work.
Q10: How can I contact CARDIAGTECH.NET for assistance?
You can contact CARDIAGTECH.NET at 276 Reock St, City of Orange, NJ 07050, United States, via WhatsApp at +1 (641) 206-8880, or visit our website at CARDIAGTECH.NET.
By following these steps and utilizing the resources available at CARDIAGTECH.NET, you can ensure a successful Xentry installation and optimize your diagnostic capabilities.