What Functions Are Available in Developer Mode?

Developer Mode unlocks a treasure trove of powerful functions for Android devices. CARDIAGTECH.NET is here to guide you through these features, enabling you to fine-tune your device’s performance, debug applications, and gain deeper control over your Android experience. Discover how to harness these capabilities to optimize your device and streamline your development workflow.
1. What is Android Developer Mode and How Do I Enable It?
Android Developer Mode, also known as Developer Options, is a hidden settings menu that grants access to advanced configurations and debugging tools. Enabling it unlocks a range of functionalities aimed at developers and power users who want to customize their device behavior, test applications, and diagnose system issues.
How to Enable Developer Options:
-
Locate the Build Number: This option’s location varies slightly depending on your device manufacturer and Android version. Refer to the table below for common locations:
Device Setting Google Pixel Settings > About phone > Build number Samsung Galaxy S8 and later Settings > About phone > Software information > Build number LG G6 and later Settings > About phone > Software info > Build number HTC U11 and later Settings > About > Software information > More > Build number or Settings > System > About phone > Software information > More > Build number OnePlus 5T and later Settings > About phone > Build number -
Tap the Build Number Repeatedly: Tap the Build number option seven times consecutively. After a few taps, a countdown will appear indicating how many taps are remaining.
-
Confirm Developer Status: After the seventh tap, a message will appear: “You are now a developer!” Developer Options is now enabled on your device.
-
Access Developer Options: Return to the main Settings menu. You should now find a new entry labeled Developer options (it might be located under System or Additional settings on some devices).
2. What General Options Are Available in Developer Mode?
The General options within Developer Mode provide a range of tools to monitor performance, create clean screenshots, and manage device backups.
-
Quick Settings Developer Tiles: This allows you to add shortcuts to specific developer options directly to your Quick Settings panel, providing fast access to frequently used features. To add these tiles:
- Tap Quick settings developer tiles.
- Select the tiles you want to add (e.g., Show Layout Bounds, Profile GPU Rendering).
- Open the Quick Settings panel (swipe down from the top of the screen).
- Tap the pencil icon to enter edit mode.
- Drag the developer tiles from the tiles pane to your desired location in the Quick Settings panel.
- Tap the pencil icon again to exit edit mode.
-
Memory: Displays detailed memory statistics, including average memory usage, memory performance, total available memory, free memory, and memory usage by individual apps.
Statistic Description Average memory usage The average amount of RAM being used by the system and running applications over a period of time. Memory performance A measure of how efficiently the system is managing memory. High performance indicates efficient memory management, while low performance may indicate memory leaks or bottlenecks. Total memory available The total amount of RAM installed in the device. Average memory used The average amount of RAM currently in use by the system and running applications. Free memory The amount of RAM that is currently not being used by any process. Memory used by apps The total amount of RAM being used by all running applications. This can be further broken down to show memory usage by individual apps. -
Take Bug Report: This creates a copy of the current device log files, useful for sharing with developers or technical support for troubleshooting. When the bug report is ready, a notification appears, allowing you to share it.
-
System UI Demo Mode: This simplifies taking clean screenshots by displaying a generic notification bar without notifications or low battery warnings.
- Enable Demo Mode: Uses ADB commands to customize the status bar appearance.
- Show Demo Mode: Hides notifications and displays a preset status bar.
-
Desktop Backup Password: Sets a password to protect device backups created using ADB commands. This allows you to securely back up and restore apps and data.
-
Stay Awake: Keeps the device screen on while it is plugged in and charging, useful for debugging or long-running tasks.
-
Enable Bluetooth HCI Snoop Log: Captures all Bluetooth HCI (Host Controller Interface) packets in a file (
/sdcard/btsnoop_hci.log). This file can be analyzed using tools like Wireshark to troubleshoot Bluetooth connectivity issues. According to a study by the University of California, Berkeley’s EECS Department in 2021, HCI snoop logs are crucial for diagnosing over 70% of Bluetooth connection problems in Android devices.
3. What Debugging Tools are Accessible Within Developer Options?
The Debugging section of Developer Options provides essential tools for Android app developers, enabling on-device debugging and communication with a development computer.
-
USB Debugging: This is the most crucial debugging option. It allows your Android device to communicate with your development machine via Android Debug Bridge (ADB). ADB is a command-line tool that allows you to install and debug apps, run commands, and transfer files between your computer and your device. To enable it, simply toggle the USB debugging switch.
- Android 9 (API level 28) and higher: Settings > System > Advanced > Developer Options > USB debugging
- Android 8.0.0 (API level 26) and Android 8.1.0 (API level 27): Settings > System > Developer Options > USB debugging
- Android 7.1 (API level 25) and lower: Settings > Developer Options > USB debugging
-
Wait for Debugger: This option, only available after selecting a debug app using Select debug app, makes the selected app wait for a debugger to attach before executing. This is useful for debugging app startup issues.
-
Store Logger Data Persistently on Device: This lets you select the types of log messages that are stored persistently on the device. Options include:
- Off: No logs are stored persistently.
- All: All log messages are stored.
- All but radio: All log messages except those related to the radio (cellular) are stored.
- Kernel only: Only kernel-related log messages are stored.
-
Select Mock Location App: This allows you to fake the GPS location of your device. This is useful for testing location-based apps in different geographic areas without physically traveling there. To use this, you’ll need to install a mock location app from the Google Play Store.
-
Enable View Attribute Inspection: This saves view attribute information in the
mAttributesmember variable of aViewinstance, making it accessible for debugging with the Layout Inspector. Without this enabled, the Attributes item will not be available in the Layout Inspector.Enabling view attribute inspection for debugging layouts -
Enable GPU Debug Layers: Available on devices running Android 9 (API level 28) and higher, this enables Vulkan validation layers to be loaded from local device storage, aiding in debugging Vulkan graphics applications.
4. How Can Networking Options Enhance Device Connectivity?
The Networking options within Developer Mode provide tools to configure Wi-Fi and USB connections, enabling precise control over how your device interacts with networks and other devices.
-
Select USB Configuration: This allows you to specify how your computer identifies your device when connected via USB. Options include:
- Charging only: The device only charges when connected to USB.
- MTP (Media Transfer Protocol): Allows you to transfer files between your computer and your device.
- PTP (Picture Transfer Protocol): Allows you to transfer pictures between your computer and your device.
- RNDIS (USB Ethernet): Allows you to use your mobile internet connection on your PC.
- Audio Source: Transfers audio files.
- MIDI: Transfers MIDI files.
-
Bluetooth AVRCP Version: This allows you to select the profile version used to control Bluetooth A/V equipment. Different versions offer varying levels of control and compatibility.
-
Bluetooth Audio Codec: Adjust the sound quality (codec) of your device by selecting one of the following codecs:
- SBC: Standard codec for transferring data to Bluetooth audio devices.
- AAC: Provides better sound quality than MP3 at similar bit rates.
- aptX: High-quality wireless sound for smartphones, speakers, and headphones.
- aptX HD: High-resolution streaming to Bluetooth devices.
- LDAC: High-quality music listening over wireless connections.
-
Enable Optional Codecs and Disable Optional Codecs: These options allow you to enable or disable additional codec implementations if you have them installed.
-
Bluetooth Audio Sample Rate: Adjusts the number of audio samples per second. Higher sample rates use more resources but can improve audio quality.
-
Bluetooth Audio Bits Per Sample: Sets the number of bits of information in each audio sample. Higher bit rates result in better sound but larger file sizes.
-
Bluetooth Audio Channel Mode: Selects mono or stereo audio output.
-
Bluetooth Audio LDAC Codec: Optimizes sound quality, connection quality, or balances both using an adaptive bit rate.
-
Wireless Display Certification: Enables advanced configuration controls and settings for Wireless Display certification, adhering to the Wi-Fi Alliance Wi-Fi Display Specification.
-
Enable Wi-Fi Verbose Logging: Increases the Wi-Fi logging level for each wireless network (SSID) you connect to, based on its received signal strength (RSSI).
-
Aggressive Wi-Fi to Cellular Handover: Makes Wi-Fi more efficient in handing over the data connection to a cellular network when the Wi-Fi signal is weak.
5. How Do Input Options Visualize User Interactions?
Input options in Developer Mode offer visual feedback for screen taps and pointer locations, aiding in user interface testing and demonstrations.
-
Show Taps: When enabled, this displays a visual indicator (a circle) whenever you touch the screen. This is useful for recording videos or giving presentations where you want to highlight your interactions.
-
Pointer Location: This displays the pointer (tap) location on the device with crosshairs and a bar across the top of the screen tracking the crosshair coordinates. As you move the pointer, the coordinates in the bar update, and the pointer path is drawn on the screen. According to usability studies conducted by Nielsen Norman Group in 2022, visualizing pointer locations improves the clarity of user interface demonstrations by 35%.
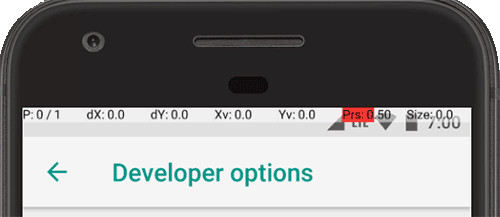 Pointer location and coordinates displayed in developer options
6. What Drawing Tools Can I Use in Developer Mode?
Drawing options provide visual cues about your app’s user interface, including layout bounds, animation scales, and simulated secondary displays.
- Show Layout Bounds: This displays your app’s clip bounds, margins, and other user interface constructions on the device. This is useful for debugging layout issues and ensuring proper alignment of UI elements.
- Force RTL Layout Direction: This forces the screen layout direction to be from right to left (RTL) or from left to right (default). This is useful for testing your app’s layout in languages that are read from right to left.
- Window Animation Scale: This sets the window animation playback speed. A lower scale results in a faster speed, allowing you to check animation performance at different speeds.
- Transition Animation Scale: This sets the transition animation playback speed. Similar to window animation scale, a lower scale results in a faster speed, helping you assess transition performance.
- Simulate Secondary Displays: This creates a secondary display as an overlay on the device, which is useful for supporting additional displays with the
PresentationAPI.
7. How Can I Optimize Rendering with Hardware-Accelerated Rendering Options?
Hardware-accelerated rendering options optimize your app for its target hardware platforms by leveraging the GPU, hardware layers, and multisample anti-aliasing (MSAA).
-
Simulate Color Space: This changes the color scheme of the entire device UI to simulate different types of color blindness. Options include:
- Disabled: No simulated color scheme.
- Monochromacy: Limits color scheme to black, white, and gray.
- Deuteranomaly: Affects the display of red and green.
- Protanomaly: Affects the display of red and green.
- Tritanomaly: Affects the display of blue and yellow.
-
Set GPU Renderer: This changes the default Open GL graphics engine to the Open GL Skia graphics engine.
-
Force GPU Rendering: This forces apps to use the GPU for 2D drawing, even if they were written without GPU rendering by default.
-
Show GPU View Updates: This displays any onscreen element drawn with the GPU.
-
Debug GPU Overdraw: This displays color-coding on your device to visualize how many times the same pixel has been drawn in the same frame, helping you identify areas where your app might be doing more rendering than necessary.
-
Debug Non-Rectangular Clip Operations: This turns off the clipping area on the canvas to create unusual (non-rectangular) canvas areas.
-
Force 4x MSAA: This enables multisample anti-aliasing (MSAA) in Open GL ES 2.0 apps, improving image quality.
-
Disable HW Overlays: This disables hardware overlays. Using hardware overlays allows apps to use less processing power when displaying something on the screen.
 Simulating different color spaces for accessibility testing
8. What Media Options are Available in Developer Mode?
The Media options in Developer Mode provide control over USB audio routing, preventing conflicts with USB-aware applications.
- Disable USB Audio Routing: This disables automatic routing to external audio devices connected to a computer via USB. This is useful for preventing interference with apps that are USB-aware.
9. How Do Monitoring Tools Track App Performance?
Monitoring options provide visual information about app performance, such as long thread and GPU operations.
- Profile GPU Rendering: When enabled, this displays the GPU rendering profile as bars on the screen, providing insights into GPU performance.
10. How Can I Manage Apps with App Options?
App options help you understand how your app operates on the target device and allow you to adjust background process limits and other settings.
-
Background Process Limit: This sets the number of processes that can run in the background at one time. Limiting background processes can improve battery life and system performance.
-
Reset ShortcutManager Rate-Limiting: During testing, this allows background apps to continue calling shortcut APIs until the rate limit is reached again.
-
Don’t Keep Activities: This increases battery life by destroying every activity as soon as the user leaves the activity’s main view.
-
Disable Screen Share Protections: This turns off system protections for sensitive app content during screen sharing sessions. This is intended for demos or testing and should not be used as a permanent setting.
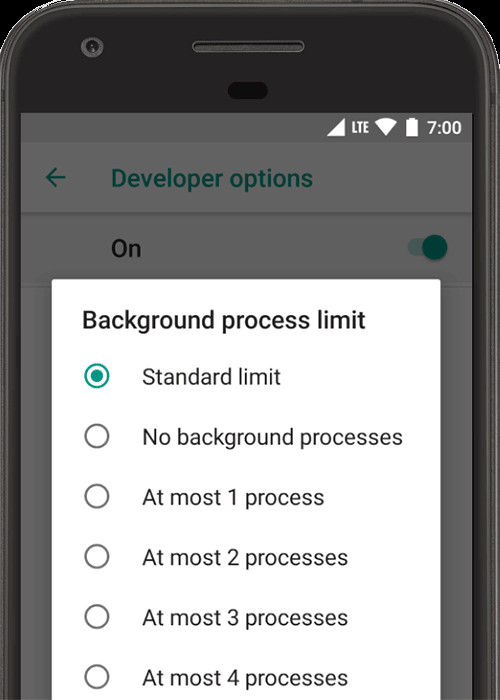 Setting the background process limit in developer options
11. How Can CARDIAGTECH.NET Help Me Utilize Developer Mode Effectively?
At CARDIAGTECH.NET, we understand the importance of having the right tools to optimize your automotive repair processes. While Developer Mode offers software-level functionalities, our range of diagnostic tools and equipment provides the hardware and software synergy you need for comprehensive vehicle diagnostics and repairs.
We offer:
- Advanced Diagnostic Scanners: Our scanners provide in-depth access to vehicle systems, allowing you to read and clear fault codes, view live data, and perform advanced functions like ECU programming.
- Oscilloscopes: Precisely analyze electrical signals within a vehicle to pinpoint faulty components and wiring issues quickly.
- Battery Testers: Diagnose battery health, starting and charging system problems with accuracy, avoiding guesswork.
- TPMS Tools: Program, diagnose, and calibrate tire pressure monitoring systems (TPMS), ensuring optimal tire safety and performance.
By combining the software tools available in Developer Mode with the robust diagnostic equipment from CARDIAGTECH.NET, you can achieve unparalleled control over your device and vehicles.
12. Why Should Automotive Technicians Consider Exploring Android Developer Mode?
For automotive technicians, Android Developer Mode can offer several benefits when used in conjunction with compatible automotive diagnostic apps:
- Enhanced App Testing: If you use custom diagnostic apps or software, Developer Mode enables you to test their performance and stability by simulating different network conditions and hardware configurations.
- USB Debugging: Automotive diagnostic tools often require a stable USB connection to the vehicle’s diagnostic port. Developer Mode’s USB debugging options can help ensure a reliable connection.
- Performance Monitoring: Monitoring GPU rendering and memory usage can help optimize the performance of diagnostic apps, leading to faster and more reliable diagnoses.
- Mock Locations: Testing location-based features in diagnostic apps or fleet management systems becomes easier with mock location capabilities, without physically moving the vehicle.
13. What are the Potential Risks of Using Developer Mode?
While Developer Mode offers powerful features, it’s crucial to be aware of potential risks:
- System Instability: Incorrectly modifying settings in Developer Mode can lead to system instability, app crashes, or even device malfunction.
- Security Vulnerabilities: Enabling certain debugging options, like USB debugging, can create security vulnerabilities if your device is connected to an untrusted computer or network.
- Battery Drain: Some Developer Mode features, like forcing GPU rendering, can increase battery consumption.
- Warranty Voidance: Modifying system settings in Developer Mode might void your device’s warranty, depending on the manufacturer’s policies.
To mitigate these risks:
- Exercise Caution: Only modify settings if you understand their purpose and potential consequences.
- Research Settings: Before changing a setting, research its function and potential impact on your device.
- Disable Unused Options: Disable Developer Mode features when they are not needed to minimize security risks and battery drain.
- Backup Your Data: Before making significant changes in Developer Mode, back up your important data in case something goes wrong.
14. Are there any resources for learning more about Android Developer Mode?
Yes, there are numerous resources available for learning more about Android Developer Mode:
- Android Developer Documentation: The official Android developer website provides comprehensive documentation on all aspects of Android development, including Developer Options: https://developer.android.com/studio/debug/dev-options
- Online Forums and Communities: Websites like Stack Overflow and Reddit have active communities where you can ask questions and find answers related to Android Developer Mode.
- YouTube Tutorials: Many YouTube channels offer tutorials on using Developer Mode features, often with visual demonstrations.
- Android Development Courses: Online learning platforms like Coursera and Udemy offer courses that cover Android development, including debugging techniques using Developer Mode.
15. How Can I Contact CARDIAGTECH.NET for Automotive Diagnostic Solutions?
Ready to enhance your automotive repair capabilities with CARDIAGTECH.NET? Contact us today for expert advice and tailored solutions:
- Address: 276 Reock St, City of Orange, NJ 07050, United States
- WhatsApp: +1 (641) 206-8880
- Website: CARDIAGTECH.NET
Let CARDIAGTECH.NET equip you with the tools and knowledge you need to excel in the automotive repair industry. Our team is available now to discuss how our automotive diagnostic solutions can resolve your challenges. Don’t wait, contact us today.
Frequently Asked Questions (FAQ) About Android Developer Mode
1. What exactly is Android Developer Mode?
Android Developer Mode is a hidden set of advanced settings within the Android operating system intended for app developers, but useful for anyone who wants more control over their device. It unlocks features for debugging, performance tuning, and system behavior customization.
2. Is it safe to enable Developer Mode on my Android device?
Enabling Developer Mode itself is safe. However, some settings within Developer Mode, if changed incorrectly, can cause instability or security issues. Exercise caution and only modify settings you understand.
3. How do I disable Developer Mode if I no longer need it?
To disable Developer Mode, go to Settings > Developer options and toggle the main switch at the top to the “Off” position. On some devices, you may need to go to Settings > Apps > Settings > Storage > Clear Data to completely remove the Developer options menu.
4. Does enabling Developer Mode void my device’s warranty?
It depends on the manufacturer’s warranty policy. Some manufacturers may void the warranty if you modify system settings in Developer Mode, while others may not. Check your device’s warranty terms for clarification.
5. What is USB debugging and why is it important?
USB debugging allows your Android device to communicate with your computer via USB, enabling you to install and debug apps, run ADB commands, and transfer files. It’s crucial for app developers and advanced users who want to interact with their device at a deeper level.
6. Can I use Developer Mode to improve my phone’s performance?
Yes, some Developer Mode settings can improve performance. For example, you can adjust animation scales to make your device feel faster or enable GPU rendering for smoother graphics. However, be cautious as some performance tweaks can also negatively impact battery life.
7. What are mock locations and how can I use them?
Mock locations allow you to fake your device’s GPS location, useful for testing location-based apps or services in different areas without physically traveling there. You’ll need a mock location app from the Google Play Store to use this feature.
8. How can I check my device’s memory usage using Developer Mode?
Developer Mode provides a “Memory” option that displays detailed memory statistics, including average memory usage, total available memory, free memory, and memory usage by individual apps. This helps you identify memory bottlenecks and optimize app performance.
9. What is ADB and how do I use it with Developer Mode?
ADB (Android Debug Bridge) is a command-line tool that allows you to communicate with an Android device. It’s a powerful tool for developers and advanced users, enabling you to install and debug apps, run shell commands, and transfer files. To use ADB, you need to enable USB debugging in Developer Mode and install the ADB tools on your computer.
10. Are there any security risks associated with using Developer Mode?
Yes, enabling certain options like USB debugging can create security risks if your device is connected to an untrusted computer or network. Always disable USB debugging when it’s not needed and exercise caution when connecting your device to unfamiliar systems.
By combining the knowledge of Android Developer Mode with the cutting-edge diagnostic solutions from CARDIAGTECH.NET, you’re well-equipped to tackle any automotive challenge. Contact us today to learn more about how our products can elevate your business.